Use HomeLab Cluster for Spring Boot APIs
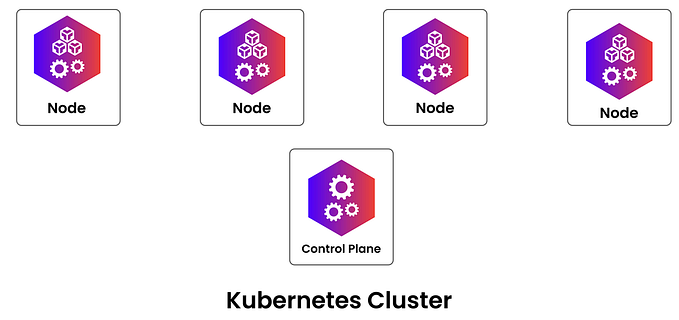
In the previous post, we set up a Kubernetes cluster and configured dynamic DNS. In this post, we are going to deploy a simple Spring Boot API to the cluster (as shown in below Step. 1)

At the end of this process, your cluster will have a load balancer connected and another Pod running the Spring Boot quote service, as shown below:
First, to deploy a service to a Kubernetes cluster, we need to prepare a Docker package.
NOTE:
While we have a master node and worker nodes for our cluster, we are not yet ready for fully useful. We will add more components as we go to demonstrate how to use the cluster effectively. Later on, we will cover some topics such as CI/CD pipelines, GitHub Actions, secrets, and key management in the next posts.
Preparing the Spring Boot API — Docker Image
The following code is a simple API that stores about 100 quotes and returns a random one as a response to an API request. (See the GitHub reference for the full code.)
- QuoteController.java
@RestController
public class QuoteController {
   private static List<Quote> quoteCache;

   @PostConstruct
   private void init() throws IOException {
      List<Quote> quotes = Util.loadQuotes();
      quoteCache = Collections.unmodifiableList(quotes);
   }

   @GetMapping("/quote")
   public Quote getRandomQuote(@RequestParam(value = "lang", defaultValue = "en") String language) {
      Random random = new Random();
      int randomIndex = random.nextInt(quoteCache.size());
      return quoteCache.get(randomIndex);
   }
}
public class Util {
   public static List<Quote> loadQuotes() throws IOException {
      ObjectMapper mapper = new ObjectMapper();
      InputStream inputStream = Util.class.getClassLoader().getResourceAsStream("quotes.json");
      return mapper.readerForListOf(Quote.class).readValue(inputStream);
   }
}- quotes.json
[
  {
    "content": "Don't cry because it's over, smile because it happened.",
    "author": "Dr. Seuss",
    "language" : "en"
  },
  {
    "content": "Be the change that you wish to see in the world.",
    "author": "Mahatma Gandhi",
    "language" : "en"
  },
  {
    "content": "Darkness cannot drive out darkness; only light can do that. Hate cannot drive out hate; only love can do that.",
    "author": "Martin Luther King Jr.",
    "language" : "en"
  },

  ....
  ....
  ....
]
Creating the Dockerfile
A Dockerfile is required to build the Docker image. It contains instructions on how to configure the K8s container. For Dockerfile syntax, refer to the reference.
- Dockerfile
# get base package from 17-jre-alpine
FROM eclipse-temurin:17-jre-alpine

# get an argument when 'docker build' executed,
# where JAR_FILE has the path of jar file (as shown in the next step)
ARG JAR_FILE

# verify the arguments
RUN echo "JAR_FILE: ${JAR_FILE}"

# Open 8080 port for incomming traffic
EXPOSE 8080
COPY ${JAR_FILE} app.jar
ENTRYPOINT ["java","-jar","/app.jar"]
NOTE: In a real-world scenario, a CI pipeline defined by a DevOps role (or team) would trigger a Docker build by a CI runner when code changes are pushed/pull requested to a git repository. However, for the purpose of focusing on Kubernetes, we are going to build locally on our PC for understanding.
Building the Container Image (Docker Build)
First, we build the Spring Boot application to create a jar file that will be included in the Docker image. (By default, with gradle, the jar file is created in the build/libs/ directory, and with maven, it is created in the target/ directory.)
# First, build jar (used Gradle in here)
./gradlew build

....
....
....

BUILD SUCCESSFUL in 435ms
1 actionable task: 1 executed
From the directory where the Dockerfile is located, run the following command. This will start building the Docker image by reading the Dockerfile in the current directory:
# Build image using the jar file created by Gradle build
docker build - build-arg JAR_FILE=build/libs/*.jar
Testing on Local Machine (Docker Run)
Once the build is complete, we can test the image built with the Dockerfile on our local machine using the docker run command. (If you have already tested or plan to test after deployment, you can skip this and move on to the next step.)
docker run -d -p 8080:8080 myimage_myversionAfter running docker run, you can access http://localhost:8080/quote in a web browser to verify that it is working properly. Alternatively, use the docker exec command to test the executable inside the image.
docker exec -it myrunningcontainer /bin/bashPushing the Docker Image to a Repository (Docker Push)
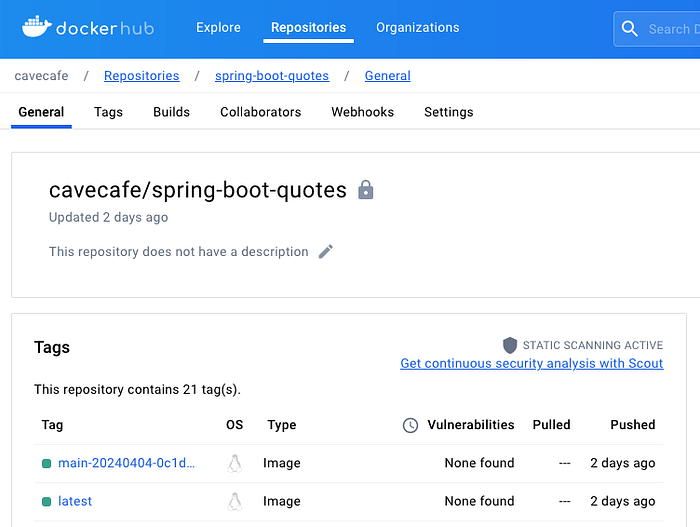
Push the Docker image to a repository where it will be stored. For this, we will use DockerHub. (Creating a free account on DockerHub allows you to create one private image and multiple public repositories as of April 2024.)
# cavecafe/spring-boot-quotes is the dockerhub path,
# which is formated as {dockerhub username}/{repository name}
# main-20240404-0c1da0e is version number that is generated my CI/CD system,
# which is {branch name of the build}-{date}-{short commit number}

> docker tag cavecafe/spring-boot-quotes:main-20240404-0c1da0e cavecafe/spring-boot-quotes:latest
> docker push cavecafe/spring-boot-quotes:latest
> docker push cavecafe/spring-boot-quotes:main-20240404-0c1da0e
Once the push is successful, you can view the pushed image on DockerHub.
Now that we have the Docker image ready, the last ‘major’ step before deployment is to configure networking.
Connecting to an External Network (Load Balancer)
While our setup so far has been within the cluster, we now need to connect the cluster to external networks and set up a load balancer to properly distribute external traffic.
Using a cloud service provider (CSP) such as AWS, Azure, GCP, or DigitalOcean makes this easy with optimized processes for each company, but for our home lab environment, we will use MetalLB. Once MetalLB is set up, we will have the following structure. (The NGINX Ingress Controller will be added when we deploy the service.)
# Set text editor as nano for kubectl (if you do not set any yet)
> export KUBE_EDITOR="nano"

# Update these sections by the KUBE_EDITOR,
# in kube-system namespace, set 'strictARP: true'
> kubectl edit configmap -n kube-system kube-proxy

apiVersion: kubeproxy.config.k8s.io/v1alpha1
    kind: KubeProxyConfiguration
    mode: "ipvs"
    ipvs:
      strictARP: true

# Download metallb-native.yml for the latest version
# (at the moment, v0.14.3)
> curl -O https://raw.githubusercontent.com/metallb/metallb/v0.14.3/config/manifests/metallb-native.yaml
  % Total    % Received % Xferd  Average Speed   Time    Time     Time  Current
                                 Dload  Upload   Total   Spent    Left  Speed
100 64769  100 64769    0     0   371k      0 --:--:-- --:--:-- --:--:--  374k

> ls -l
total 64
-rw-rw-r-- 1 thomas thomas 64769 Feb  4 19:03 metallb-native.yaml

# Apply the MetalLB YAML file (metallb-native.yaml) to your K8s cluster
> kubectl apply -f metallb-native.yaml

namespace/metallb-system created
customresourcedefinition.apiextensions.k8s.io/bfdprofiles.metallb.io created
customresourcedefinition.apiextensions.k8s.io/bgpadvertisements.metallb.io created
customresourcedefinition.apiextensions.k8s.io/bgppeers.metallb.io created
customresourcedefinition.apiextensions.k8s.io/communities.metallb.io created
customresourcedefinition.apiextensions.k8s.io/ipaddresspools.metallb.io created
customresourcedefinition.apiextensions.k8s.io/l2advertisements.metallb.io created
serviceaccount/controller created
serviceaccount/speaker created
role.rbac.authorization.k8s.io/controller created
role.rbac.authorization.k8s.io/pod-lister created
clusterrole.rbac.authorization.k8s.io/metallb-system:controller created
clusterrole.rbac.authorization.k8s.io/metallb-system:speaker created
rolebinding.rbac.authorization.k8s.io/controller created
rolebinding.rbac.authorization.k8s.io/pod-lister created
clusterrolebinding.rbac.authorization.k8s.io/metallb-system:controller created
clusterrolebinding.rbac.authorization.k8s.io/metallb-system:speaker created
configmap/metallb-excludel2 created
secret/webhook-server-cert created
service/webhook-service created
deployment.apps/controller created
daemonset.apps/speaker created
validatingwebhookconfiguration.admissionregistration.k8s.io/metallb-webhook-configuration created

> arp -n

Address          HWtype  HWaddress           Flags Mask   Iface
172.16.45.212    ether   72:fe:01:09:c3:bc   C            calibda59069057
172.16.45.213    ether   66:fc:a2:0d:c2:a8   C            cali0b8c331d322
192.168.1.1      ether   21:fd:04:01:54:e4   C            enp0s31f6
172.16.45.211    ether   f1:f0:03:02:c1:a3   C            caliedf9d0b6c10
192.168.1.102    ether   ac:fe:a5:aa:6e:1c   C            enp0s31f6
192.168.1.104    ether   68:fe:06:8b:a3:62   C            enp0s31f6
192.168.1.106    ether   8a:fd:f7:a5:c1:36   C            enp0s31f6
192.168.1.195    ether   67:fb:a8:a0:a4:21   C            enp0s31f6

> kubectl get endpointslices -A

NAMESPACE              NAME                              ADDRESSTYPE   PORTS        ENDPOINTS                     AGE
default                kubernetes                        IPv4          6443         192.168.1.100                 11d
kube-system            kube-dns-mvr8x                    IPv4          9153,53,53   172.16.45.211,172.16.45.213   11d
kubernetes-dashboard   dashboard-metrics-scraper-spln4   IPv4          8000         172.16.2.149                  11d
kubernetes-dashboard   kubernetes-dashboard-7g5dq        IPv4          8443         172.16.68.221                 11d
metallb-system         webhook-service-zk74p             IPv4          9443         172.16.121.238                98m

# Check MetalLB is installed successfully
# by the series of the following commands

> kubectl -n metallb-system get pods

NAME                          READY   STATUS    RESTARTS   AGE
controller-5f56cd6f78-cwjn9   1/1     Running   0          169m
speaker-5rd6j                 1/1     Running   0          169m
speaker-bcxcx                 1/1     Running   0          169m
speaker-njjgl                 1/1     Running   0          169m
speaker-pz9p2                 1/1     Running   0          169m

# Ensure ipaddresspools, l2advertisements entries as shown bellow
> kubectl api-resources | grep metallb

kubectl api-resources | grep metallb
bfdprofiles                                    metallb.io/v1beta1                     true         BFDProfile
bgpadvertisements                              metallb.io/v1beta1                     true         BGPAdvertisement
bgppeers                                       metallb.io/v1beta2                     true         BGPPeer
communities                                    metallb.io/v1beta1                     true         Community
ipaddresspools                                 metallb.io/v1beta1                     true         IPAddressPool
l2advertisements                               metallb.io/v1beta1                     true         L2Advertisement

## Set address range that you want to use
## In here (192.168.1.201-192.168.1.210)
> nano metallb-config-map.yaml

apiVersion: v1
kind: ConfigMap
metadata:
  namespace: metallb-system
  name: config
data:
  config: |
    address-pools:
    - name: default
      protocol: layer2
      addresses:
      - 192.168.1.201-192.168.1.210

# Create ConfigMap using the metallb-config-map.yaml
> kubectl apply -f metallb-config-map.yaml
configmap/config created
Deploying the Docker Image to the Cluster
The deployment process consists of a single YAML file, but we will break it down step by step.
First, we need to define (create) a namespace where the image will be deployed.
Note: A namespace is an ‘isolated space’ in Kubernetes where objects can interact with each other. It is a way to group and separate different deployments so that they do not interfere with other namespaces. Resource usage limits and access controls can also be set at the namespace level.
Creating a Namespace
Create a new namespace (spring-boot-quotes) by creating a yaml file as follows:
# Create a namespace using namespace.yml file
> nano namespace.yml- namespace.yml
# Create a namespace
apiVersion: v1
kind: Namespace
metadata:
  name: spring-boot-quotes
Apply the namespace.yml file to the cluster with kubectl and verify that the namespace has been created.
# Create a namespace unsing namespace.yml file
> kubectl apply -f namespace.yml

# Verify the namepsace 'spring-boot-quotes' created successfully
> kubectl get namespace
NAME                     STATUS   AGE
cloudflare-ddns          Active   35m
default                  Active   2d
kube-node-lease          Active   2d
kube-public              Active   2d
kube-system              Active   2d
spring-boot-quotes       Active   1m
Configuring Internal Networking (Service & Ingress)
To configure the networking for the service we will deploy, we will create a Service and an Ingress. Create a YAML file as follows:
Note: A Service is an abstraction layer for applications within the cluster. It is connected to the external load balancer and is where a stable (always available) IP address and port can be defined for the application.
Note: An Ingress is an object that configures information for an Ingress Controller. It includes routing information such as ports, paths, and services, the service (backend) to route traffic to, SSL-related settings (certificate, host, TLS forwarding, etc.), load balancing algorithms, and more.
- network.yml
### Define a Service for application 'spring-boot-quotes'
apiVersion: v1
kind: Service
metadata:
  name: spring-boot-quotes-service
  namespace: spring-boot-quotes
spec:
  selector:
    app: spring-boot-quotes
  ports:
    - protocol: TCP
      port: 80           # exposed port number
      targetPort: 8080   # forworded port number into application
      nodePort: 30090    # mapped port number in the cluster
  type: LoadBalancer
---
### Define an Ingress to connect with the Service
apiVersion: networking.k8s.io/v1
kind: Ingress
metadata:
  name: spring-boot-quotes-ingress
  namespace: spring-boot-quotes
spec:
  ingressClassName: nginx
  rules:
    - host: 'quotes.cavecafe.app'   # hostname to be connected in the Ingress
      http:
        paths:
          - backend:
              service:
                name: spring-boot-quotes-service
                port:
                  number: 80
            path: /
            pathType: Prefix
Apply the network.yml file to the cluster with kubectl and verify that the Service (spring-boot-quotes-service) and Ingress (spring-boot-quotes-ingress) have been created.
# Create the Service and Ingress using network.yml file
> kubectl apply -f network.yml
# Verify the service is created 'spring-boot-quotes-service' created successfully
> kubectl get services -A
NAMESPACE NAME TYPE CLUSTER-IP EXTERNAL-IP PORT(S) AGE
default kubernetes ClusterIP 10.96.0.1 <none> 443/TCP 2d
kube-system kube-dns ClusterIP 10.96.0.10 <none> 53/UDP,53/TCP,9153/TCP 2d
metallb-system webhook-service ClusterIP 10.98.117.127 <none> 443/TCP 2d
spring-boot-quotes spring-boot-quotes-service LoadBalancer 10.96.27.47 192.168.1.202 80:30090/TCP 2m
# Verify the service is created 'spring-boot-quotes-ingress' created successfully
> kubectl get ingress -A
NAMESPACE NAME CLASS HOSTS ADDRESS PORTS AGE
spring-boot-quotes spring-boot-quotes-ingress nginx quotes.cavecafe.app 192.168.1.203 80 2mDefining the Pod Specification for Deployment
A Deployment defines how an application will run/maintain/scale in a Pod. Create a yaml file as follows:
Note: A Pod is the basic execution unit in Kubernetes that can independently manage a set of Containers. Containers within a single Pod can share network, storage, environment variables and other resources. This allows multiple Containers to form a single application unit and communicate quickly with each other like localhost. A Pod is deployed on a single physical/virtual machine with one Pod corresponding to one machine. All Containers in a Pod share the same network and resources. Pod is the management unit for applications as scaling, updates, error recovery are managed at the Pod level.
Note: A Deployment is an object that defines how to run/maintain/scale an application in a Pod. It uses a Pod template defined in the Deployment to create the desired number of pods and supports various deployment strategies. It defines all the functionality related to deployment, such as pod creation, scaling, automated updates, zero-downtime deployments through rolling updates, adjusting availability and resilience through replica settings, supporting rollbacks, and reflecting changes like container image patches.
- deployment.yml
apiVersion: apps/v1
kind: Deployment
metadata:
  name: spring-boot-quotes
  namespace: spring-boot-quotes
  labels:
    app: spring-boot-quotes
spec:
  replicas: 1
  selector:
    matchLabels:
      app: spring-boot-quotes
  strategy:
    type: RollingUpdate
    rollingUpdate:
      maxSurge: 1
      maxUnavailable: 1
  template:
    metadata:
      name: spring-boot-quotes
      labels:
        app: spring-boot-quotes
    spec:
      containers:
        - name: spring-boot-quotes
          image: cavecafe/spring-boot-quotes:latest # docker repository path
          imagePullPolicy: IfNotPresent
          ports:
            - containerPort: 8080
          securityContext:
            runAsUser: 1001
            runAsGroup: 3000
          resources:
            requests:
              memory: 32Mi
              cpu: 60m
      restartPolicy: Always
Apply the deployment.yml to the cluster by running the following. (The cluster will reflect the deployment as soon as it is applied.) Verify that the Deployment object has been created properly.
# Create the Deplotment using deployment.yml file
> kubectl apply -f deployment.yml
# Verify the service 'spring-boot-quotes-service' created successfully
> kubectl get deployment -n spring-boot-quotes
NAME READY UP-TO-DATE AVAILABLE AGE
spring-boot-quotes. 1/1 1 1 1m
> kubectl describe deployment -n spring-boot-quotes
Name: spring-boot-quotes
Namespace: spring-boot-quotes
CreationTimestamp: Mon, 04 Mar 2024 17:57:25 +0000
Labels: app=spring-boot-quotes
Annotations: deployment.kubernetes.io/revision: 2
Selector: app=spring-boot-quotes
Replicas: 1 desired | 1 updated | 1 total | 1 available | 0 unavailable
StrategyType: RollingUpdate
MinReadySeconds: 0
RollingUpdateStrategy: 1 max unavailable, 1 max surge
Pod Template:
Labels: app=spring-boot-quotes
Containers:
spring-boot-quotes:
Image: cavecafe/spring-boot-quotes:latest
Port: 8080/TCP
Host Port: 0/TCP
Requests:
cpu: 60m
memory: 32Mi
Environment: <none>
Mounts: <none>
Volumes: <none>
Conditions:
Type Status Reason
---- ------ ------
Available True MinimumReplicasAvailable
Progressing True NewReplicaSetAvailable
OldReplicaSets: spring-boot-quotes-7ccfcb562e (0/0 replicas created)
NewReplicaSet: spring-boot-quotes-7d79c38b41 (1/1 replicas created)
Events: <none>To verify that the deployment was successful, use the internal IP address assigned to the spring-boot-quotes service (192.168.1.202) when configuring the network.
> curl -v http://192.168.1.202/quote
> curl -v http://192.168.1.202:80/quote

*   Trying 192.168.1.202:80...
* Connected to 192.168.1.202 (192.168.1.202) port 80 (#0)
> GET /quote HTTP/1.1
> Host: 192.168.1.202
> User-Agent: curl/7.81.0
> Accept: */*
>
* Mark bundle as not supporting multiuse
< HTTP/1.1 200
< Content-Type: application/json
< Transfer-Encoding: chunked
< Date: Mon, 08 Apr 2024 06:09:43 GMT
<
* Connection #0 to host 192.168.1.202 left intact
{"content":"When one door of happiness closes, another opens, but often we look so long at the closed door that we do not see the one that has been opened for us.","author":"Helen Keller","language":"en"}
You should see a JSON response like the following for the REST API request (GET /quote):
{
  "content":"When one door of happiness closes, another opens, but often we look so long at the closed door that we do not see the one that has been opened for us.",
  "author":"Helen Keller",
  "language":"en"
}
So far, we have:
- Created a simple API with Spring Boot
- Built a Docker image and pushed it to a repository
- Created the necessary objects (namespace, service, ingress, deployment) to apply them into K8s cluster one by one
At this point, the service is available on the ‘local network’ with an internal IP address only. In the next post, we will explore how to create a proxy outside the cluster to access the service from outside our home lab and the steps to use a TLS certificate.
In the next post, we are going to connect the network between inside and outside of the network with Nginx Proxy Manager, and, build and deploy another type of service (.NET Core API) as an example in the HomeLab K8s Cluster.