우리집 쿠버네티스 클러스터 꾸미기 (#2 Cloudflare DDNS)
For English, please follow the link.
지난 글 에서는 쿠버네티스 클러스터를 일단 구성해 봤습니다. 집 외부에서, 이 Homelab 클러스터로, 안정적으로 접속할 수 있도록 하는 방법에 대해 알아봅니다.
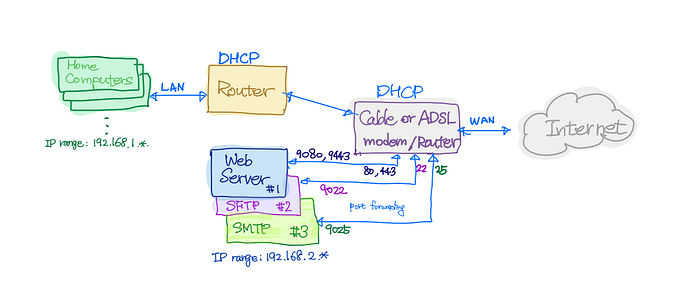
정확하게 말하자면, 이미 만들어 놓은 K8s 클러스터에 Cloudflare DDNS를 설치하고 내 도메인에 맞게 셋업하는 방법에 대해 알아봅니다. 이 글에서 다루는 절차는 클러스터에 다음과 같은 변화를 주게 됩니다 (검은 점선으로 표시된 부분)

당연한 얘기지만, 인터넷 서비스 제공업체(ISP)에서, 가정용 인터넷에는 정해진 IP 주소가 아닌, 언제든지 바뀔 수 있는 동적(Dynamic) IP 주소를 할당해 줍니다. 그래서 내 IP 주소가 언제든 바뀔 수 있어, 외부에서 IP 주소로 접속하는 방법으로는 안정적인 서비스를 보장받을 수 없습니다. 또 SSL HTTPS 보안 (SSL 인증서를 사용)을 적용하기 위해서는 내 소유의 (또는 나한테 관리 권한이 있는) 인터넷 도메인을 사용해야 합니다. 여기부터는 내 도메인이 있다고 가정합니다.
DDNS (Dynamic DNS)
자주 바뀔 수 있는 내 가정용 IP 주소에 대한 해결책으로, Dynamic DNS (DDNS)를 사용합니다. DDNS는 주기적으로 (보통 몇분에 한번씩 업데이트) 내 ISP에서 제공하는 실제 IP주소 (public IP 주소)가 변경을 확인, 언제든지 접속가능한 현재의 IP 주소로 도메인 등록 정보를 업데이트 해 주는 서비스 입니다. 그 동작은 ACME (Automatic Certificate Management Environment) RFC8555 표준에 정의된 방식을 기반으로 도메인 등록 업체마다 조금씩 다른 구현방식을 사용하고 있습니다.

우선, 내 domain 의 등록업체 (DNS Registerar or DNS service provider) 에서, Dynamic DNS를 지원하는지 확인해 보세요. 많은 도메인 등록업체들은 DDNS를 지원해 줍니다. GoDaddy, Cloudflare, Google Domains (* 구글은 Squarespace에 도메인 등록 비지니스를 팔아서 DDNS 등록 불가)
안전하게 클러스터를 사용하기 위해서는 TLS certificate 를 기반으로 암호화된 HTTPS 를 사용하는 것은 이제 기본이라고 볼 수 있습니다. 현재, 사용할 도메인을 가지고 있지 않다면, 일년에 $15 정도에 도메인을 등록할 수 있어서 (이하에서는 사용하고 있는 Cloudflare 를 기준으로 설명함)
Cloudflare Dynamic DNS
Cloudflare는 인터넷의 CDN 및 기타 네트워크 관련 비지니스로 유명한 회사이지만, 도메인 등록기관으로 사용자에게 편리하고 유용한 기능(무료로 사용해도 기본적인 DDoS 방어, Proxy, DDNS)을 제공하고 있습니다.

- 우선, Cloudflare DDNS 에서 사용할 API Token을 생성/기록해 놓습니다 (My Profile -> API Tokens -> Create Token)

2. Cloudflare website 에서 DNS Setup 은 ‘Full’ 로 셋팅하고,

3. ‘Always Use HTTPS’ 선택하고, 최소 TLS 1.2 이상 사용으로 설정합니다.

4. 마지막으로 Zone ID 를 확인/기록해 놓습니다.

이제, Cloudflare DDNS 컨테이너를 내 클러스터에 올려서 자동으로 내 IP주소 변경을 Cloudflare에 전달해 주도록 합니다.
My First Container, Cloudflare DDNS
Cloudflare DDNS가 K8s 클러스터에서 사용하게 될 첫번째 컨테이너입니다. 쿠버네티스의 거의 모든 작업들은 YAML (*.yml, *.yaml) 파일을 다루는 것부터 시작합니다.
YAML 파일은 각종 configuration을 계층적으로 기술할 수 있도록 만들어진 파일 형식입니다. Cloudflare DDNS에서 사용할 configuration file (config.json)을 내 도메인 관련정보를 넣어 작성합니다.
# to write my own configuration file
$ nano config.json
서비스를 하게 될 domain의 hostname이 www.cavecafe.app 과 api.cavecafe.app 이라고 가정하면 다음과 같은 config.json 파일을 만들게 됩니다.
{
  "cloudflare": [
    {
      "authentication": {
        "api_token": "r5nY........ REDACTED .........wdzEDZ"
      },
      "zone_id": "1043........ REDACTED ........b605",
      "subdomains": [
        {
          "name": "",
          "proxied": true
        },
        {
          "name": "www",
          "proxied": true
        },
        {
          "name": "api",
          "proxied": true
        }
      ]
    }
  ],
  "a": true,
  "aaaa": false,
  "purgeUnknownRecords": false,
  "ttl": "Auto"
}
방금 만든 json 파일을 base64 형식으로 변환한 내용을 준비해 둡니다.
# now encode the config.json as base64 format
$ cat config.json | base64
ewogICJjbG.................................
...........................................
...........................................
...........................................
...........................................
.....................................8iCn0K
이제, cloudflare-ddns.yaml 을 만들고 위에서 만든 base64 형식의 config.json 내용을 복사해 넣습니다.
---
# create namespace for Cloudflare DDNS container as 'cloudflare-ddns'
apiVersion: v1
kind: Namespace
metadata:
  name: cloudflare-ddns
---
# create Secret for Cloudflare DDNS container
# The value for 'config.json' can be produced by the following shell command
# cat config.json | base64
# copy & paste into the section
apiVersion: v1
data:
  config.json: ewogICJjbG............ REDACTED ..............8iCn0K
kind: Secret
metadata:
  creationTimestamp: null
  name: cloudflare-ddns
  namespace: cloudflare-ddns
---
apiVersion: apps/v1
kind: Deployment
metadata:
  name: cloudflare-ddns
  namespace: cloudflare-ddns
spec:
  selector:
    matchLabels:
      app: cloudflare-ddns
  template:
    metadata:
      labels:
        app: cloudflare-ddns
        secret-name: cloudflare-ddns
    spec:
      containers:
      - name: cloudflare-ddns
        image: timothyjmiller/cloudflare-ddns:latest
        resources:
          limits:
            memory: '32Mi'
            cpu: '50m'
        env:
        - name: CONFIG_PATH
          value: '/etc/cloudflare-ddns/'
        volumeMounts:
        - mountPath: '/etc/cloudflare-ddns'
          name: cloudflare-ddns
          readOnly: true
      volumes:
      - name: cloudflare-ddns
        secret:
          secretName: cloudflare-ddns
YAML file 을 실제 클러스터에 적용한 다음, 제대로 실행되고 있는지 확인합니다.
# apply cloudflare-ddns.yml
$ kubectl apply -f cloudflare-ddns.yml
namespace cloudflare-ddns created
secret cloudflare-ddns created
deployment cloudflare-ddns created

# verify the cloudflare-ddns applied and runnnig
$ kubectl get pods -n cloudflare-ddns
NAME                               READY   STATUS    RESTARTS   AGE
cloudflare-ddns-58dfd9b747-8wx48   1/1     Running   0          1m
마지막으로 웹브라우저에서 www.cavecafe.app 을 입력하면 다음과 같은 에러 화면이 나오면 ‘정상’입니다. (Cloudflare DNS 까지는 제대로 도달한 했지만 실제 website는 없는 상태)

이번 글에는 Cloudflare를 사용해서, 어떻게 Dynamic DNS를 설정하는지 간단히 알아봤습니다. 다음 글에서는, 실제로 내 API 서비스 (Spring Boot, 또는 .NET Core API)를 올려서 테스트 해 보도록 합니다.