Setting Up a Useful Kubernetes Cluster at Home
Let’s repurpose outdated computers for a worry-free testing and learning cluster.
I recently found myself with some spare time and a few old, small computers that had been sitting around unused. Instead of letting them go to waste, I decided to repurpose them and create a Kubernetes cluster at home. Nowadays, home internet speeds are quite fast (up to 1Gbps up/down), and this cluster I set up has proven to be convenient for performing functionality tests and pursuing hobby projects.

As shown in the photo, these are devices from various manufacturers, but they are compact in size, occupying minimal space. With low-power consumption, an i5 processor, 16GB of RAM, and a 500GB SSD, they are suitable for running lightweight community websites, VPN servers, and various API servers for proof-of-concept purposes. They offer ample capabilities for these applications.
NOTE: This article focuses solely on the installation process. For basic information about Kubernetes, please refer to the introductory documentation on the official website.
Host OS Installation
First, you need to wipe out the existing operating system and install Ubuntu Server 22.04 LTS (the latest LTS version as of current time).
Download the Ubuntu Server 22.04 LTS ISO (CD-ROM image) file and follow the installation instructions provided in the link for detailed guidance on the installation process.

To minimize resource usage on Kubernetes nodes, you can choose the Ubuntu Server (minimized) option during the installation process. This option will install a minimal set of modules and packages, reducing the burden on low-performance computers.

While installing the Linux OS, you can choose to install MicroK8s and Canonical Livepatch along with it. MicroK8s is a lightweight Kubernetes distribution that allows you to run a single-node Kubernetes cluster on your machine. Canonical Livepatch is a service that provides automated kernel patching without the need for a system reboot. By selecting these options during the installation process, you can have MicroK8s and Canonical Livepatch installed and ready to use on your system.

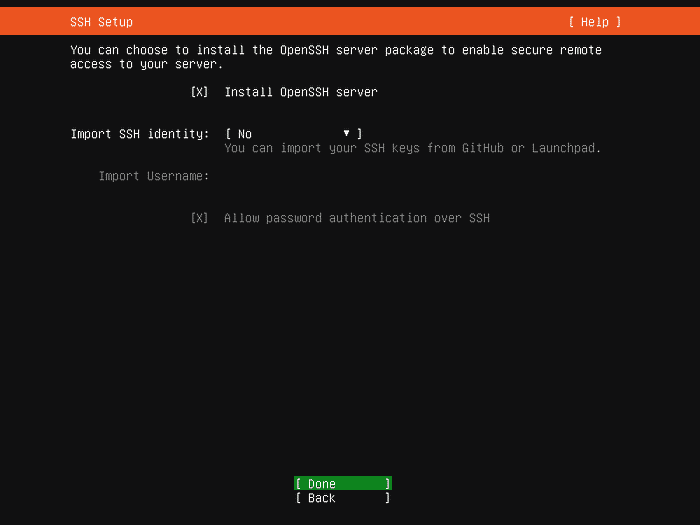
Additionally, you can choose to install the SSH server during the installation process. This will enable you to remotely log in to the system via SSH and proceed with the remaining setup steps. By installing the SSH server, you’ll have the flexibility to manage and configure your system remotely using SSH login.
Kubernetes Common Setup for all your Nodes
Once the host OS installation is complete, SSH into each computer and follow the following steps:
# Set hostname for each machine
sudo hostnamectl set-hostname "{your-hostname}.local"
exec bash

# Apply any updates and reboot (*)
sudo apt update
sudo apt upgrade
sudo reboot

# Disable swap for better performance
sudo swapoff -a
sudo sed -i '/ swap / s/^\(.*\)$/#\1/g' /etc/fstab

# Add settings to containerd.conf
# overlay (for using overlayfs),
# br_netfilter (for ipvlan, macvlan, external SNAT of service IPs)
sudo tee /etc/modules-load.d/containerd.conf <<EOF
overlay
br_netfilter
EOF
sudo modprobe overlay
sudo modprobe br_netfilter

# Add settings to kubernetes.conf
# Allow IPv4, IPv6 and IP forwarding
sudo tee /etc/sysctl.d/kubernetes.conf <<EOF
net.bridge.bridge-nf-call-ip6tables = 1
net.bridge.bridge-nf-call-iptables = 1
net.ipv4.ip_forward = 1
EOF

# Reload updated config
sudo sysctl --system

# Install required tools and CA certificates
sudo apt install -y curl gnupg2 software-properties-common apt-transport-https ca-certificates

# Add Docker repository
sudo curl -fsSL https://download.docker.com/linux/ubuntu/gpg | sudo gpg --dearmour -o /etc/apt/trusted.gpg.d/docker.gpg
sudo add-apt-repository "deb [arch=amd64] https://download.docker.com/linux/ubuntu $(lsb_release -cs) stable"

# Then, install containerd
sudo apt update
sudo apt install -y containerd.io
containerd config default | sudo tee /etc/containerd/config.toml >/dev/null 2>&1
sudo sed -i 's/SystemdCgroup \= false/SystemdCgroup \= true/g' /etc/containerd/config.toml
sudo systemctl restart containerd
sudo systemctl enable containerd

# Add Kubernetes repository
curl -s https://packages.cloud.google.com/apt/doc/apt-key.gpg | sudo gpg --dearmour -o /etc/apt/trusted.gpg.d/kubernetes-xenial.gpg
sudo apt-add-repository "deb http://apt.kubernetes.io/ kubernetes-xenial main"

# Then, install Kubernetes components
sudo apt update
sudo apt install -y kubelet kubeadm kubectl
sudo apt-mark hold kubelet kubeadm kubectl
2. modify ‘/etc/hosts’ file to add hostnames of each nodes
# Install text editor 'nano'
sudo apt install nano
sudo nano /etc/hosts
Now, add the local IP addresses of all the computers that will be part of the cluster to the /etc/hosts file, and then save it. (Note: The following IP addresses are examples, the actual hostnames will vary depending on your environment. You need to check the actual IP address of each computer using the ifconfig command on every node, i.e., ifconfig | grep inet ⏎)
# k8s cluster nodes
192.168.1.150 master.local master
192.168.1.151 worker1.local worker1
192.168.1.152 worker2.local worker2
192.168.1.153 worker3.local worker3
3. Install Docker Community Edition
# k8s cluster nodes
sudo apt-get install docker-ce
4. Open TCP port for K8s API communication (default 6443)
# Open TCP port for K8s API (default 6443)
sudo iptables -A INPUT -p tcp --dport 6443 -j ACCEPT

# To diable swap
sudo swapoff -a
sudo sed -i '/ swap / s/^\(.*\)$/#\1/g' /etc/fstab

# open /etc/fstab file to check swap is commented out
sudo nano /etc/fstab
5. If the line containing swap.img is not already commented out, add a # at the beginning of the line to comment it out.
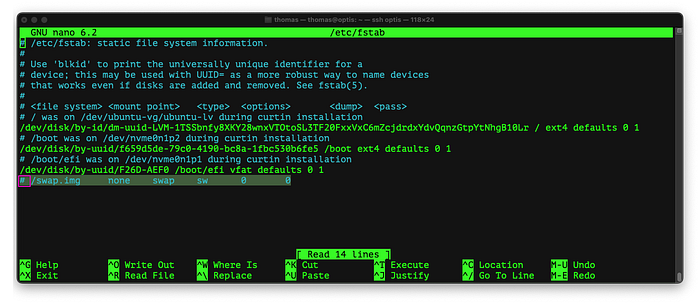
6. Finally, reboot, and double check swap is gone.
# reboot
sudo reboot

# after reboot, check the swap is gone
free -h
Master Setup
Now, it’s time for setting up Master Node.
# only for master node
sudo kubeadm config images pull
sudo reboot

# note: '--ignore-preflight-errors=all' is added
# due to initialization stops with some minor errors
sudo kubeadm init --control-plane-endpoint=leno.k8s.local --ignore-preflight-errors=all
Once everything is done, you will see the following screen.
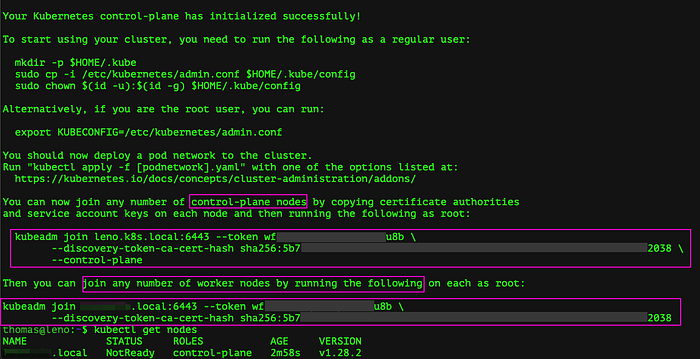
As the above screen guided, perform the following steps to setup a node as your Master Node.
# Copy /etc/kubernetes/admin.conf for using the node
# as a Non-root user
# Create .kube/config
mkdir -p $HOME/.kube
sudo cp -i /etc/kubernetes/admin.conf $HOME/.kube/config
sudo chown $(id -u):$(id -g) $HOME/.kube/config

# Install Calico Network Plugin
# Currently (v3.25.0) is the latest, check the latest first for yours
kubectl apply -f https://raw.githubusercontent.com/projectcalico/calico/v3.25.0/manifests/calico.yaml
Connect the Master Node with Worker Nodes
Connecting worker nodes to the master node is a straightforward process. To connect a computer that will serve as a worker node, log in to that computer (either via SSH or directly) and perform the following steps.
# '--ignore-preflight-errors=all' used to bypass on minor errors
sudo kubeadm join master.local:6443 --token wf.......REDACTED..........u8b \
 --discovery-token-ca-cert-hash sha256:5b7............REDACTED.......................2038 --ignore-preflight-errors=all

# reboot
sudo reboot
After rebooting each worker nodes, verify on the master node that the connection has been established correctly.
# check the worker node is connected
kubectl get nodes

NAME              STATUS     ROLES             AGE       VERSION
worker1.local     Ready      <none>            2m6s      v1.28.2
master.local      Ready      control-plane     33m       v1.28.2


# list all pods in the system namespace (kube-system)
kubectl get pods -n kube-system
Now, the basic setup of the Kubernetes cluster is complete. In the next step, let’s configure an internet domain for use in the cluster.
